

Adjustments Required to Install Commerce Scale Unit in the VHD Development Environment
Dzmitry Alabin, Senior Developer at ICS, discusses the prerequisites for installing the CSU in the VHD (Tier-1) environment and gives troubleshooting tips for potential issues that may arise during the installation process.
 23 May 2024


Intro
Retail functionality isn’t initially workable in the VHD environment due to this main issue:
DA1023 - Could not resolve identity. The Microsoft Entra ID account is not mapped to an employee in Retail headquarters. |
Running the RetailTenantUpdateTool script does not resolve the issue. To fix it, we need to follow some workaround steps, which are described in the Retail Setup section below. For now, we can use Retail, but it is based on the previous .NET framework.
Our next goal is to install and run the Commerce Scale Unit (CSU) in the VHD environment. Thanks to this the helpful article, we can automate most routine activities in Azure. Let me describe the steps necessary to be taken on a local fresh VHD to install the Commerce Scale Unit.
Prerequisites:
- Clean 10.0.37 VHD from the LCS portal
- Set up the downloadable VHD for first use
- Install PU63 (optional)
Retail Setup
The F&O (Finance and Operations) application is already linked to the tenant of our organization, which is not the case for the Retail. Let’s make some adjustments to link the Retail to our organizational tenant as well.
| CommerceRunTime.Config
Update the ..\RetailServer\webroot\bin\CommerceRunTime.Config file with our Azure AD Application (Client) ID (this value is used for generating self-signed certificates).
- Locate this line:
<add key="audienceUrn" value="spn:00000015-0000-0000-c000-000000000000" /> - Replace the
'00000015-0000-0000-c000-000000000000'value with the same Azure AD Application (Client) ID value that was created at the beginning of the deployment.
| RetargetRetailServer.ps1
Update the ..\RetailSDK\References\Dynamics.Servicing.RetailDeployment.72\1.0.30.90\ ServiceModels\RetailServer\Scripts\RetargetRetailServer.ps1 file. For each SqlCmd command in the file, you need to add the -TrustedCertificate parameter. It should look like this:
$rtsProfiles = Invoke-SqlCmd -ServerInstance $settings.AosDatabaseServer |
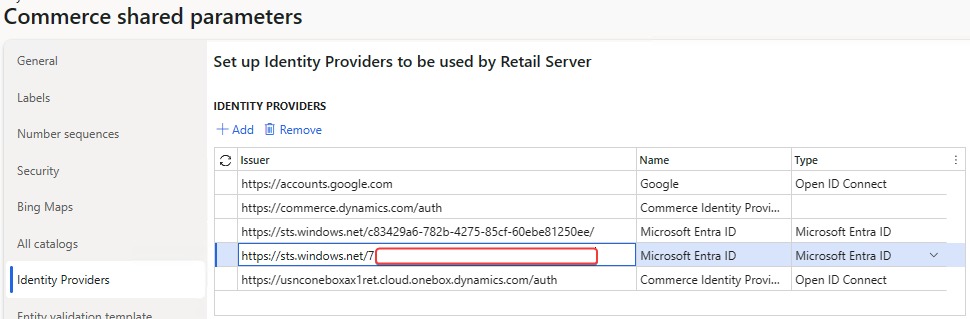
Execute the RetargetRetailServer.ps1 script. After the script finishes executing, a new identity provider will be created in AX for your organization’s tenant:
Go to AX and change the status of the latest ‘Default channel database batch job’ batch job created by RetailServiceAccount. This job will initially be in the canceled status.

Installation
Now we can start installing CSU. Let’s do it with the article.
I encountered some problems during installation, but you can avoid them. Before executing the Commerce_CreateCertAndAppReg.ps1 script, you need to run the following command:
Install-Module Microsoft.Graph -RequiredVersion 2.9.0 -Force -AllowClobber |
Configure for strong cryptography based on Microsoft article:
[HKEY_LOCAL_MACHINE\SOFTWARE\Microsoft\.NETFramework\v2.0.50727] |
[HKEY_LOCAL_MACHINE\SOFTWARE\Wow6432Node\Microsoft\.NETFramework\v2.0.50727] |
Also, we can’t download the ‘Configuration file’ from the ‘Channel Database’ form, as we don’t have an LCS (Life Cycle Services) environment. For this case, we need to use the environmentId value from the current Retail Server:
https://usnconeboxax1ret.cloud.onebox.dynamics.com/Commerce/GetEnvironmentConfiguration
In debug mode, you can set this environmentId value to be able to save the ‘Configuration file’:

Get ready to dive into Store Commerce!
Customize, optimize and unlock the full potential of your Dynamics solutions with our expert guidance.